3D Model PowerPoint Holiday Bow
On Windows and macOS, PowerPoint, and Outlook support inserting 3D models directly into your documents, workbooks or presentations to illustrate a point. You can rotate models 360 degrees or tilt up and down to show a specific feature of an object.
The improvements in this update are available to Office 365 subscribers. If you’d like to be among the first to access these improvements, join the Office Insider program.
Quick tutorial video from Microsoft
Adding 3D objects from a local file
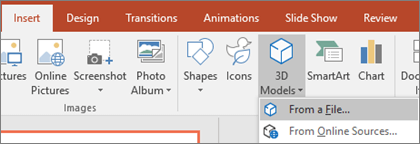
You insert 3D models into your files much the same way as other images. On the Insert tab of the ribbon select 3D Models and then From a File.

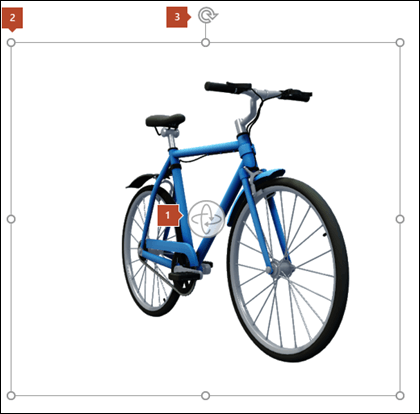
Once it’s inserted you can use the controls to manipulate the image:


Use the 3D control to rotate or tilt your 3D model in any direction. Just click, hold and drag with your mouse.

Drag the image handles in or out to make your image larger or smaller

You can still use the rotation handle to rotate your image clockwise or counter-clockwise, but you’ll get a much better experience using the 3D rotation control we talked about above.
Changing how your 3D models look in Office
When you insert a 3D model into your Office file you’ll get a contextual tab on the ribbon under 3D Model Tools called Format. On the format tab there are some handy controls to help you customize how your 3D images are going to look.
The 3D Model Views gallery gives you a collection of preset views that you can use on your image. For example you can quickly select the head-on view or the top-down view.

If you’ve got multiple 3D models and you’re having trouble selecting the one you want to work with, click the Selection Pane to turn on the list of objects. Then you can easily select the image or images that you want to select.
The Align tool helps you place your image on the page or slide—at the top or side, for example.
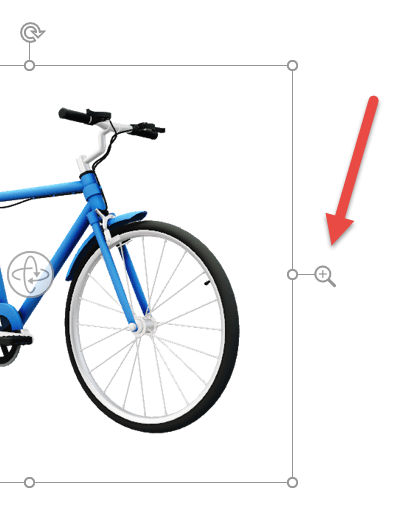
Pan & Zoom gives you control of how your 3D image fits within the frame. Click the Pan & Zoom button, then click and drag the object within the frame to move it. Use the Zoom arrow on the right-side of the frame to make the object appear larger or smaller within the frame.

Once you have your 3D images inserted you can do all kinds of exciting things with them, such as using PowerPoint’s Morph Transition to make the object appear to rotate or spin.

